Friday, November 26, 2010

Playing with PMC Pro...

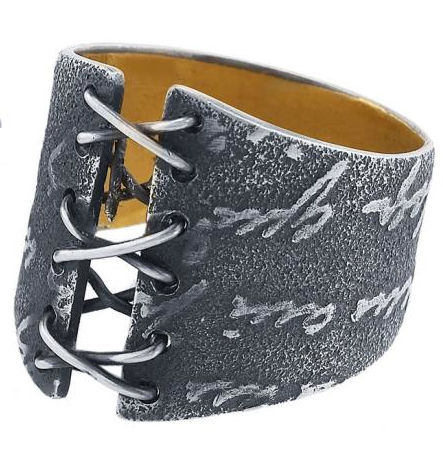
Well, I think I'm hooked... I actually didn't want PMC Pro to work so well because I've never been a fan of the whole carbon business... but it does. This stuff is soooo tough! This ring has a band as thick as a nickel and it won't bend - I tried to twist it and it didn't budge.

Not that I think Pro will replace my other silver clays, but for some applications it's going to be great. Again, not a fan of the carbon, but for making tough rings or delicate parts, I can get around that...

This ring is only 3 cards thick - and with the shrinkage rate being greater than PMC3, the resulting ring is even thinner than you'd expect. C'mon, who would make a PMC ring only 3 cards thick? Not me - till now. I tried to squeeze and crush it and... nothing.

Since that went so well, I made another one like it with some really skinny snakes around the edges (they worked beautifully) - also 3 cards thick and it won't crush either. I've asked students to try to squeeze the rings and they were impressed with the strength too. All the rings were fired in carbon for 1 hour. They were constucted @ 3.5-4 sizes larger. I didn't put any ring plugs in them. I figured if they got too small I'd just stretch them. I did end up stretching the wider band, but that worked just fine. 

And I wondered about making hollow forms - how small and thin could I make them? These tiny lentils (yep, that's a dime) are for earrings. They are only 2 cards thick. They could have been domed more, but I got caught up in the excitement of making them and didn't look for a better dome... 

And now the question you've been waiting for (OK, I was), how well does it WATER ETCH? 

The answer is (after a couple of tries) great! The best result so far is with my favorite wax (Mayco wax resist - on the heart shown here).

I did try my new kistka on this clay because it has worked well on PMC+, but with Pro I had some blistering issues. I shelf fired the all the water etched pieces prior to carbon firing to burn off the wax. 

after carbon firing
after shelf firing
In firing the first piece done with the kistka, I got distracted when I programmed the kiln for the shelf firing and accidently set it for 1400F (firing temp) instead of the recommended shelf firing temp of 1000F (not shown here). I thought the resulting blistering was from shelf firing too hot. So I tried it again with another piece (above right), this time at 1000F - but still got the blistering. Then I decided to try the Mayco wax. This time, after the shelf firing there was no blistering. It did shelf fire for an hour - I intended to stop the kiln after 30 mins but got busy and it ran the whole hour. But I don't think that was the difference. Just to be sure, I'm going to do another piece with the the Mayco wax shelf fired for 30 mins, and one with the kistka wax shelf fired for 1 hour to see if that affects the blistering. All the water etched pieces were then carbon fired (after shelf firing) for an hour. I just wanted to be sure they were fully sintered.

My tests were mostly designed for learning about the strength of this new version of PMC. The shrinkage rate is shown at left with the fired piece and the cutter used to make it. The clay is good and sticky with long working time, though snakes were still subject to cracking if you weren't careful. It made the smoothest slip - letting it rest after mixing is important.

The bails on the water etched pendants are only 2 cards thick and very strong! This two-card bail can't be crushed (with my hands), nor did it snap when I put some pressure on the joint - which was not reinforced from the back.

So I'm impressed. I can see using it for ring bands and more delicate bails and findings. I have many more tests in mind, but so far, so good. I'd love to hear what others think if they've tried it.


Thursday, November 4, 2010

PMC Pro - Here we go...

It's finally here! After hearing about this new metal clay product at the PMC Conference this summer, PMC Pro is now available - and my own order is probably somewhere in the middle of the US right now...

Tuesday night I had the opportunity to learn more about this delicious* (OK, not literally) new product. Alison Lee presented one of her fabulous craftcast classes featuring Tim McCreight, with guest comments by Celie Fago, Barbara Becker Simon, and Jeanette Landenwitch. They shared their experiences which provided a lot of insight into using the new material.

Taking a class, (online or otherwise) is a great way to cut your learning curve. I learned some great tips. For some reason, people thought this class was going to be some kind of "infomercial." It was anything but... nobody was selling anything - just sharing their experiences with the material. And we all got the info we needed to get rolling...

Celie Fago's carved ring
Barbara Simon's carved bangle 
One of the things I was thrilled to learn about was how wonderful it is for carving. Both Celie and Barbara commented on how well it worked. I have carved original PMC and loved it. Plus and 3 just don't carve as well. COPPRclay and BRONZclay are good for carving, but when all is said and done, I'm really a silver girl...

Celie Fago tear-away ring
So now I'll get to carve this new stuff and I can't wait! (Hurry UPS!) It takes texture just as beautifully as other versions of PMC - and can accept Keum-boo, though it may be a little more challenging to apply than the fine silver. Celie mentioned that this ring required a little patching... still, it works well enough - and as Celie said "it sticks" which, after all, is the bottom line.

For an hour and thirty minutes we got to hear all about PRO - and ask questions too... there were a lot of questions with about 100 attendees in the class!

Some of the notes from the class are now available on the PMC Guild website.

Just a quick synopsis:
  • This stuff is STRONG! The various strength tests show it to be far superior to any previous PMC formula. You can work thinner without sacrificing strength. 
  • Fired in carbon - 1400ºF for 1 hour (or more, depends on several variables - see the notes). Pieces should be about 1/2" apart (10 cm) and have that much carbon on top and below. Too much carbon will inhibit sintering.
  • Shrinkage is about 15-20%. A bit more than PMC 3 or PMC +
  • Hattie Sanderson added that she sizes rings 3.5 sizes larger to accommodate the shrinkage.
  • Can't be directly mixed with the other clays, but can be joined with the other clays and fired. Requires a shelf firing/carbon firing combo (30 mins shelf 1000ºF; 30 mins 1400ºF carbon).
  • The slip is easy to make - just add water (and lavender oil too - Tim has used this on the greenware as well as the fired clay).
  • As noted above, will accept Keum-boo, no prep necessary.
  • Can be enameled. Using the two-stage shelf firing/carbon firing method is best (per Jeanette Landenwitch). This is not unlike the experience I found with the COPPRclay. Enamel adhered best when it was shelf fired prior to carbon firing.
  • Wash tools between using for other silver clays, just as you would for base metal clays. Do not share sanding tools, as these can load up with material and contaminate your regular clay.
  • The melting point is lower (typical of an alloy) so you have to be sure not to fire with original clay (requiring 1650ºF firing) or use hard solder (flows above the melting point). 
And there's more... when I actually get a chance to play with it, I'll be happy to share what I learn too. Cutting edge stuff - literally, Tim showed a knife he'd made that actually held an edge - pretty cool!

* Barbara Becker Simon's description 

Tuesday, October 26, 2010

Capturing detail in water etching

As we were planning a water etching demo for class this last session, Maria Hartland (a new student), mentioned that she had done Ukrainian egg painting (Pysanky). It's a beautiful traditional wax resist and dye method of decorating eggs (like batik for fabric). She asked about using the beeswax and stylus (kistka) for water etching. I told her I'd seen it discussed as a possibility a few times on the Yahoo Metal Clay group over the years, but didn't know if anyone ever really pursued it - and I'd never had the chance to try it myself. We were all excited when Maria generously offered to bring her stylus to class for us to try.

The following week, Maria not only brought in the stylus, but some of her beautiful eggs as well. These large ones are ostrich eggs, they're amazingly detailed.


The wax is melted until it flows and is applied with the kistka (stylus). Different size tips give different lines. The painting and dying process builds the colors and takes a great deal of time. She also brought several of her smaller eggs as well, also beautifully done.


Maria brought in two electric kistkas and showed us a traditional one too. The traditional ones are heated with a candle flame to melt the wax. We played a little bit with the electric ones in class, but didn't really have time to do much. She kindly offered to let me borrow one for the week.


Well, darn if the week didn't fly by (as usual)... but the night before I had to return the kistka, I grabbed a couple of dry pieces of clay and played. Let me first say that I've always really loved the brush painting and the flow of the liquid wax (and still do), but after using this handy-dandy little wax application device, all I can say is "wow."


Now, these examples were just tests... but what really impressed me was the control and level of detail I was able to get. The images above are two sides of the same piece. It's PMC+ which is the best for water etching and especially for fine lines. It's only one inch tall after firing and just look at the tiny lines - which dried immediately!  These lines withstood the etching process much better than similar fine lines painted with the liquid wax would have. Unfortunately, I didn't have a lot of time to play - so I only tried the one size tip - but there are several sizes available.

This example was the first piece I tried when I was getting the hang of using the kistka and melted wax (hardly a work of art) it's even smaller - only 1/2" tall!


Yes, of course I ordered myself one of these amazing electric kistkas... (now if I could just order some time to play with it!). Will it change the way I water etch? Guess we'll just wait and see.

If you're interested in more info on water etching, Here are some resources. I wrote an article in Art Jewelry Magazine in September 2006. You can also find the instructions I contributed to Sherri Haab's revised and expanded edition of The Art of Metal Clay. And then there's my own little book... The Little Book of Water Etching and Enameling for Metal Clay. Water etching instruction by CeCe Wire can be found in PMC Technic.

If you're interested in getting in touch with Maria about her eggs, you can contact me via comments and I'll pass along your info to her (I won't publish any comment with an email address). 

Thursday, October 21, 2010

Old is new, and new is old

Our local chapter of the PMC Guild brought Robert Dancik into town last weekend for a workshop using "Faux Bone," a PVC material he developed. The workshop was a blast. Robert is a wonderful teacher and our group had a great time working with him. Lots of creativity in the air. It was great to spend a weekend just playing...


I have always loved saw-piercing metal and wondered how it would work with the Faux Bone. I decided to give it a try by sawing a cuff bracelet that was inspired by one I'd made 30 years ago as a metals student.

Gail Lannum caught me in the act of sawing...

Alcohol inks were used to color the material. I like the way the white shows around the openings when the color was sanded to tone down the intensity. It's a little rough, but it was a test. I'll probably go back in and finish it a little more one of these days.

Here is my original bracelet. And after all these years, it's still one of my favorite projects from my school days. The section set in the center was my first piece of Mokume-gane.

Many of the pieces made in the workshop took advantage of the possibilities of making Faux Bone look like an ancient relic. Gail made this one in the workshop. It was cool to take this shiny white PVC - something very new - and make it look very old. There are so many things you can do with this material.

We had some serious fun!

Thursday, September 9, 2010

The Art of Metal Clay (revised and expanded)

When I saw Sherri Haab at the PMC Conference, she gave me a copy of her revised and expanded book, The Art of Metal Clay. It was fun to see the finished product - Sherri had asked me to contribute to the new section on etching and she included my instructions and photos showing the water etching process.

The new book looks great. I finally had a chance to look it over today - and even found time to check out the DVD that's included. The original edition of the book is one I've always recommended to students, and the new version will now take its place. Sherri does an excellent job of taking the reader through the basics and sample projects that cover a wide variety of techniques. Her instructions are clear, easy to follow, and well illustrated with photos. You'll find instruction in silver, gold, bronze, and copper clays, as well as info on stone setting, mold making, adding resin, polymer clay and much more. 

Several of the sample projects in the book are the same as the first edition, though a number of those are repeated with a different example demonstrated (like the bezel for delicate stones). Other project ideas are expanded with more instruction or information. There are new sections about bronze and copper, etching, and enamel. Some things from the first edition were not included and there are several new gallery images too.

The DVD has four projects (not in the book) and provides an opportunity to watch Sherri at work. It's filmed very well so you can really see how she does each step. My original edition of the book didn't include a DVD (later versions did), so I'm not actually sure if these are new videos or not. 

And I'm not biased just because I'm a contributor. The Art of Metal Clay (revised and expanded) is a thorough and clear instructional book for working with metal clay. Of course, you might guess that I happen to think the water etching part is one of the highlights...
:)

Tuesday, August 31, 2010

Details, details...

Attending to details has been my focus lately. I've been firing lots of COPPR and BRONZclay inlay pieces from a workshop I taught recently. Fourteen students made dozens of pieces - it was lots of fun... and the detail work of carefully firing all those pieces kept me very busy!

Mentoring details - a bit of adventure this summer has been the chance to act as sort of a mentor for an emerging metal clay artist - a college student who was introduced to me by a metalsmith friend. It's been fun to watch his work evolve as he explores the material on his own - pretty much without instruction or preconceived notions - then he shares his creations and observations with me. It's been fun and different from my usual experience as a teacher. He first tried his hand at silver clay and recently made some really creative rings from the new FastFire BRONZclay. Gotta get those last rings fired before he returns to school. My kilns have been getting quite a workout lately! 

Class details - new classes were listed on my website today. Lots of prep and details for those too. I'm really looking forward to the start of the new session. 

And if you really want to talk about details, check out the amazing jewelry of John Paul Miller. I had a chance to see his work up close again this past weekend - it's on exhibit at the Cleveland Museum of Art. He is known for his incredible work with granulation and enamel. His beautiful presentation renderings and sketch books are on display too. 

A few years ago I was honored to have the opportunity to chat with Mr. Miller about jewelry making and metal clay. You may be surprised to learn that he was among the first artists to try PMC at the Haystack Experimental Workshop in May of 1995. Though he didn't pursue metal clay work, he was very interested to talk about the material and how it had evolved from that first workshop. It would have been great to be in one of Mr. Miller's classes at the Cleveland Institute of Art - some of my friends who are CIA jewelry artists were lucky enough to have that experience. 

Visit the links above, check out some of the images. If you live near the Cleveland Museum of Art, you really should visit and see the work in person - it's all about the details...

Saturday, August 7, 2010

The 2010 PMC Conference, inspiration, "big news" and fun.

That's where I was this time last week... the 5th International Precious Metal Clay Conference held at Purdue University. Back in 2002, I attended the very first conference at the College of Wooster and have attended all five. Metal clay has come a long way since then - and it's been pretty amazing to be a part of its evolution.

The speakers and presenters were excellent. Linda Darty's keynote address started us off with some wonderful inspiration - I really enjoyed seeing so much enamel work (as you may know, enamel is near and dear to me). She shared how various events in her life had been a significant influence on her work - the interpretations were wonderful. The second day, Bruce Baker spoke to the group the with lots of energy and insight into the business of craft. He knows the business inside and out and his observations were so interesting. Alison Lee of Craftcast spoke on the third day with a delightful presentation about her "Life in Code." She reminded us how our experiences shape our lives - that when we look back we can see where they have influenced us. And how those of us who have pursued art (for hobby or profession) may have shown some interest/aptitude as children. I could relate to many things she shared about her childhood, specifically the influence of creative parents/grandparents and being given opportunities to try things that sparked even more creativity.

The conference featured some great presentations and demonstrations by many accomplished metal clay artists. I was honored to be among the presenters. And I was sorry I couldn't attend everyone's presentation - we had to choose which ones to attend - and that was really a challenge. The whole time I kept wishing I could be in two places at once!

There was an excellent show titled "Cultural Messages." Well, I heard it was an excellent show... I didn't even get a chance to see it. I kept thinking I'd get to it when I had enough time to see the whole thing but then I never found the time (insert a big frowny face here...). I think the images of the pieces will be online at some point, but it won't be quite the same as seeing it in person.

A new FASTfire BRONZclay was released as of the conference. I haven't fired anything with this new version bronze clay from Metal Adventures, but I've handled it - it has a great texture and consistency. The real advantage is that it will fire in as little as 2 hours!

PMC Pro from Mitsubishi was announced at the conference. There was a lot of buzz about this new material. It's supposed to be stronger than sterling... I tried to bend Barbara Becker Simon's bracelet (she invited me to) and couldn't get it to move. It's 90% silver, which makes it a lower silver content than sterling (.925). This brought a lot of questions about what that remaining 10% might be. Suggestions ranged from copper to germanium to platinum and even aluminum! It may be some combination of the above. We won't know until closer to the release date (October)... the formula is a closely guarded secret - at least until all the patents are in place.

At the 2004 PMC Conference I was privileged to present two seminars. One was on Small Scale Mass Production and the other was on Enameling on PMC. Presenting and preparing two seminars wore me out, so the next two conferences I just attended with no responsibilities. This year, my love of water etching inspired me to offer a Tech Expo presentation on the process - specifically Water Etching on Hollow Forms (another favorite of mine). In addition, I was invited to be part of a demo team during one of the lecture sessions. Sherry Fotopoulos and I had fun demonstrating "Creating with Coils." 

It was so wonderful to see old friends and meet new ones. That was so much fun. I love connecting with artists from all over the world. The people I've met through metal clay are pretty amazing. I'll be counting the days 'till we meet again.